
Typical Location Business Headshot
I thought it might be interesting to show you a few behind-the-scenes photos of a typical location business headshot and explain what all goes into this type of photography.

There are several things that need to be taken into account when selecting the exact spot where the subject will stand or sit.
What will the background look like in the final photo?
One photographic technique I like to use for shooting location headshots is to use “minimum depth of field”, which translates to “throwing the background out of focus”. As a photographer, I’ve learned to imagine what a scene or background will look like out of focus.
When looking at an environment, a layman may see clutter and distraction, whereas a seasoned photographer might see fields of attractive color and interesting compositional elements. This is usually a good reason to leave a little time before the actual shoot, or even for a separate location scout, to pick the very best spot to set up to shoot.
Is there enough space for the camera to be far enough away from the subject?
In order to use the minimum depth of field mentioned above, there needs to be sufficient distance between the camera and the subject, and the subject and the background. In many business locations, especially offices, this distance is often in short supply. Many otherwise great backgrounds fall out of consideration because of the lack of space.
Is the lighting good, or at least controllable, in the area you want to shoot?
Part of creating a successful location business headshot is, of course, the lighting. when discussing a possible location for a shoot, a client will make a judgment of a possible location based on the lighting. “There’s plenty of light” or “it’s really dark in there” are terms I ofter times hear.
The thing is, sometimes dark is good and sometimes too much light is bad. Again, that’s why an experienced photographer will want to consider the exact lighting conditions in the exact spot of the headshot. Sometimes, I can use available light, but most times, I’ll either need to supplement the existing lighting conditions or completely overpower the ambient light. I may need to turn off a couple of lights then and add my own.
I usually travel with five “strobe” lights that I use to get the look I want, so use them very deliberately. Many people think that making a good photo is about “how much” light there is, whereas it’s the direction and intensity of the light that really make the difference between so-so photography and really great photography.
Is the amount of foot traffic going to be a problem in the area?
If you’re shooting in a business environment, you need to be aware of the foot traffic in the area. You don’t want to disrupt business and be a distraction to others in the office. Sure, flashes going off will tend to disrupt people a little, but the idea is to minimize the disruption.
Another reason to pick a low-traffic area is that it tends to make the subject being photographed a bit self-conscious and leads to a lesser quality headshot. It won’t affect some subjects and others it will create a big mess.
When considering the traffic issue, the bottom line is that it’s a compromise. Sometimes the best backgrounds are in high traffic areas. You and the client will have to decide how much distraction is acceptable.
Making your location into my studio
I took these photos to illustrate some of the things I do to create a quality location business headshot. I shoot for this company on a regular basis. Whenever they get a new hire, of a certain level, I get a call to come in a create a headshot of that person to be used on the company webpage and for their internal uses.
This headshot location was chosen because of several reasons.
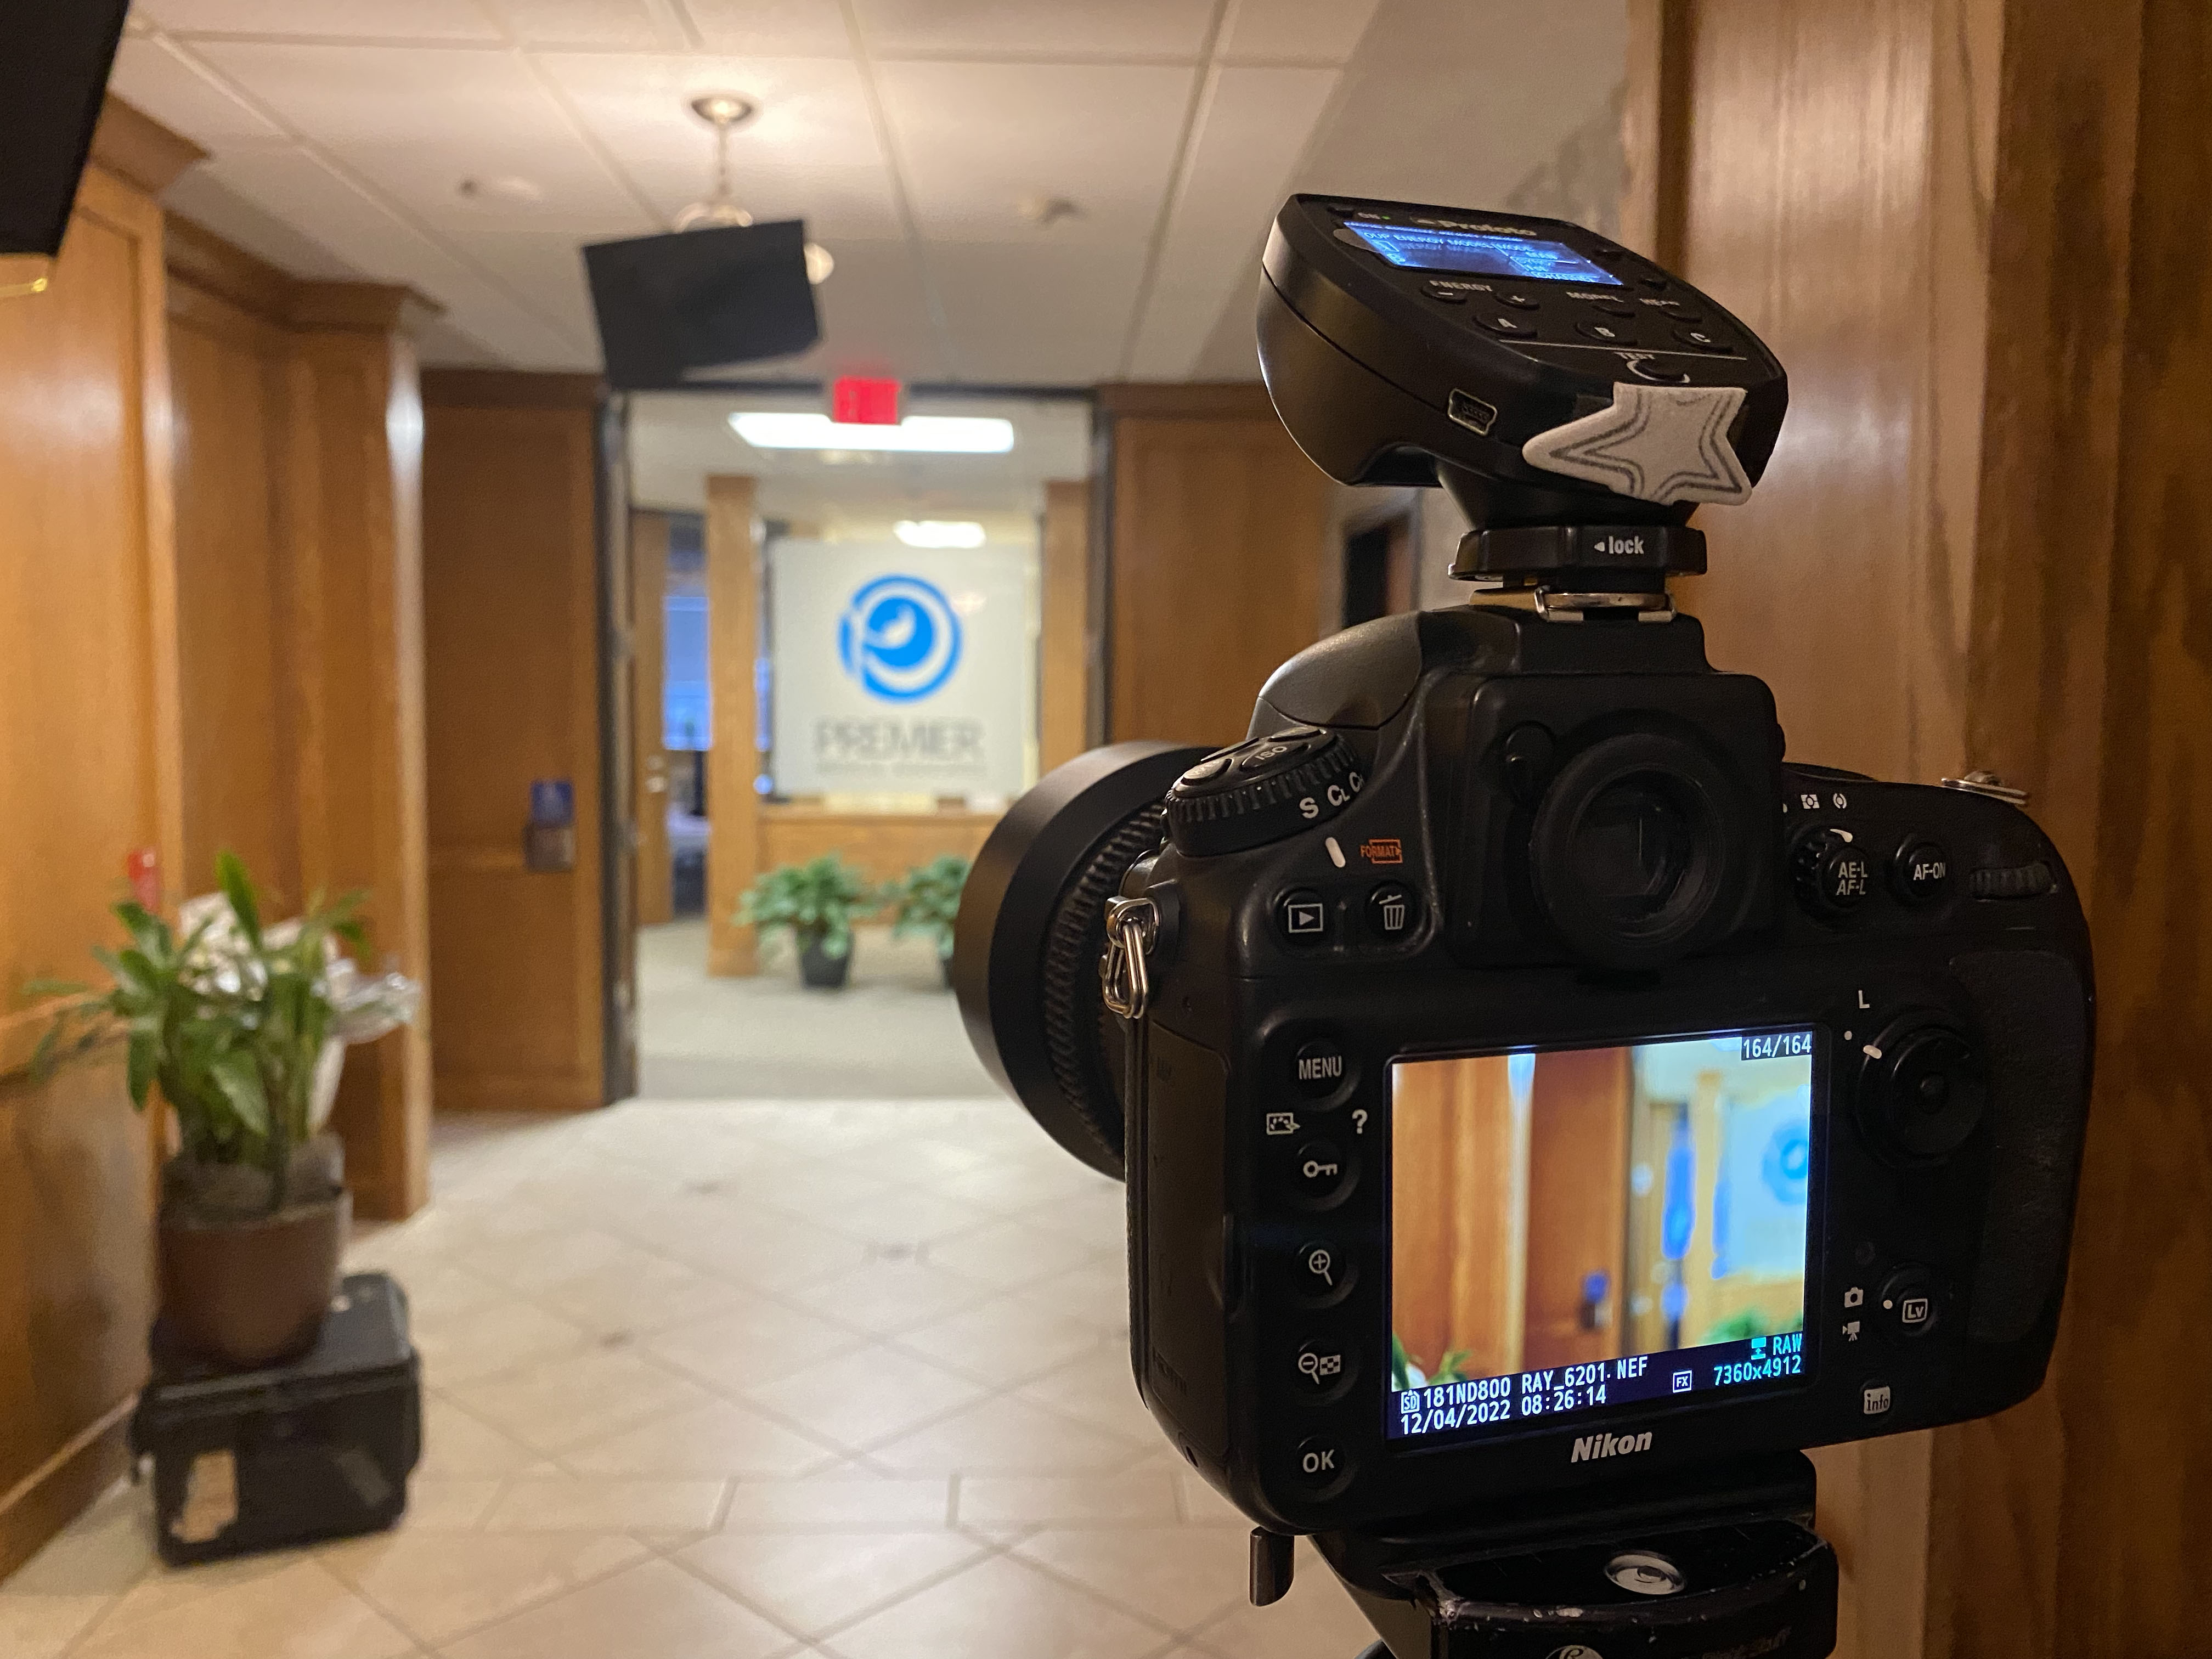
1. There is enough distance to pull off a good shot. In the photo below, you can see a small square tile where the subject will stand. I use an 85mm f 1.4 lens for this setup, so I don’t need a ton of distance between the camera and the subject, but I have plenty of room between the subject and the background.
I shoot at f 1.4, and if you know anything about photography, you’ll know that doesn’t give you much depth-of-field. In fact, I have to be REALLY careful when focusing on the subject. If I get the focus right, the eye of the subject will be in focus and the eyelash and ear will be a bit “soft”. It’s easy to miss focus, but when I get it right, it looks pretty cool. I need to watch the subject to see if they move at all, even a lean will affect what’s in focus.
In the photo below, notice a few things that I did to make the environment better for getting a good headshot. See the black square over the light in the middle of the frame? That’s called “cinfoil” (sp?). It’s basically aluminum foil that has been painted black. This cuts down on the amount of light hitting the subject from behind. It also minimizes the amount of ambient light in the room. This allows me to get a higher light ratio, which means darker shadows on the subject. I basically fold the edge of the foil and hang it from the light, keeping it from directly hitting the subject.
The same thing is true with the flag in the upper left of the photo. There are two spotlights, that if I didn’t flag them off, would affect the lighting on the subject.
One more thing to notice in the photo below is the plants sitting on one of my camera cases. I use the case to raise up the plants to help obscure the water fountain directly behind them. I didn’t bring the plants, they are always in the hall.
If you’re wondering what the little white thing is on the back of my camera, it’s a piece of foam that protects my eyeglasses from getting scratched on my transmitter. A little trick I came up with after figuring out how my lenses were getting scratched.
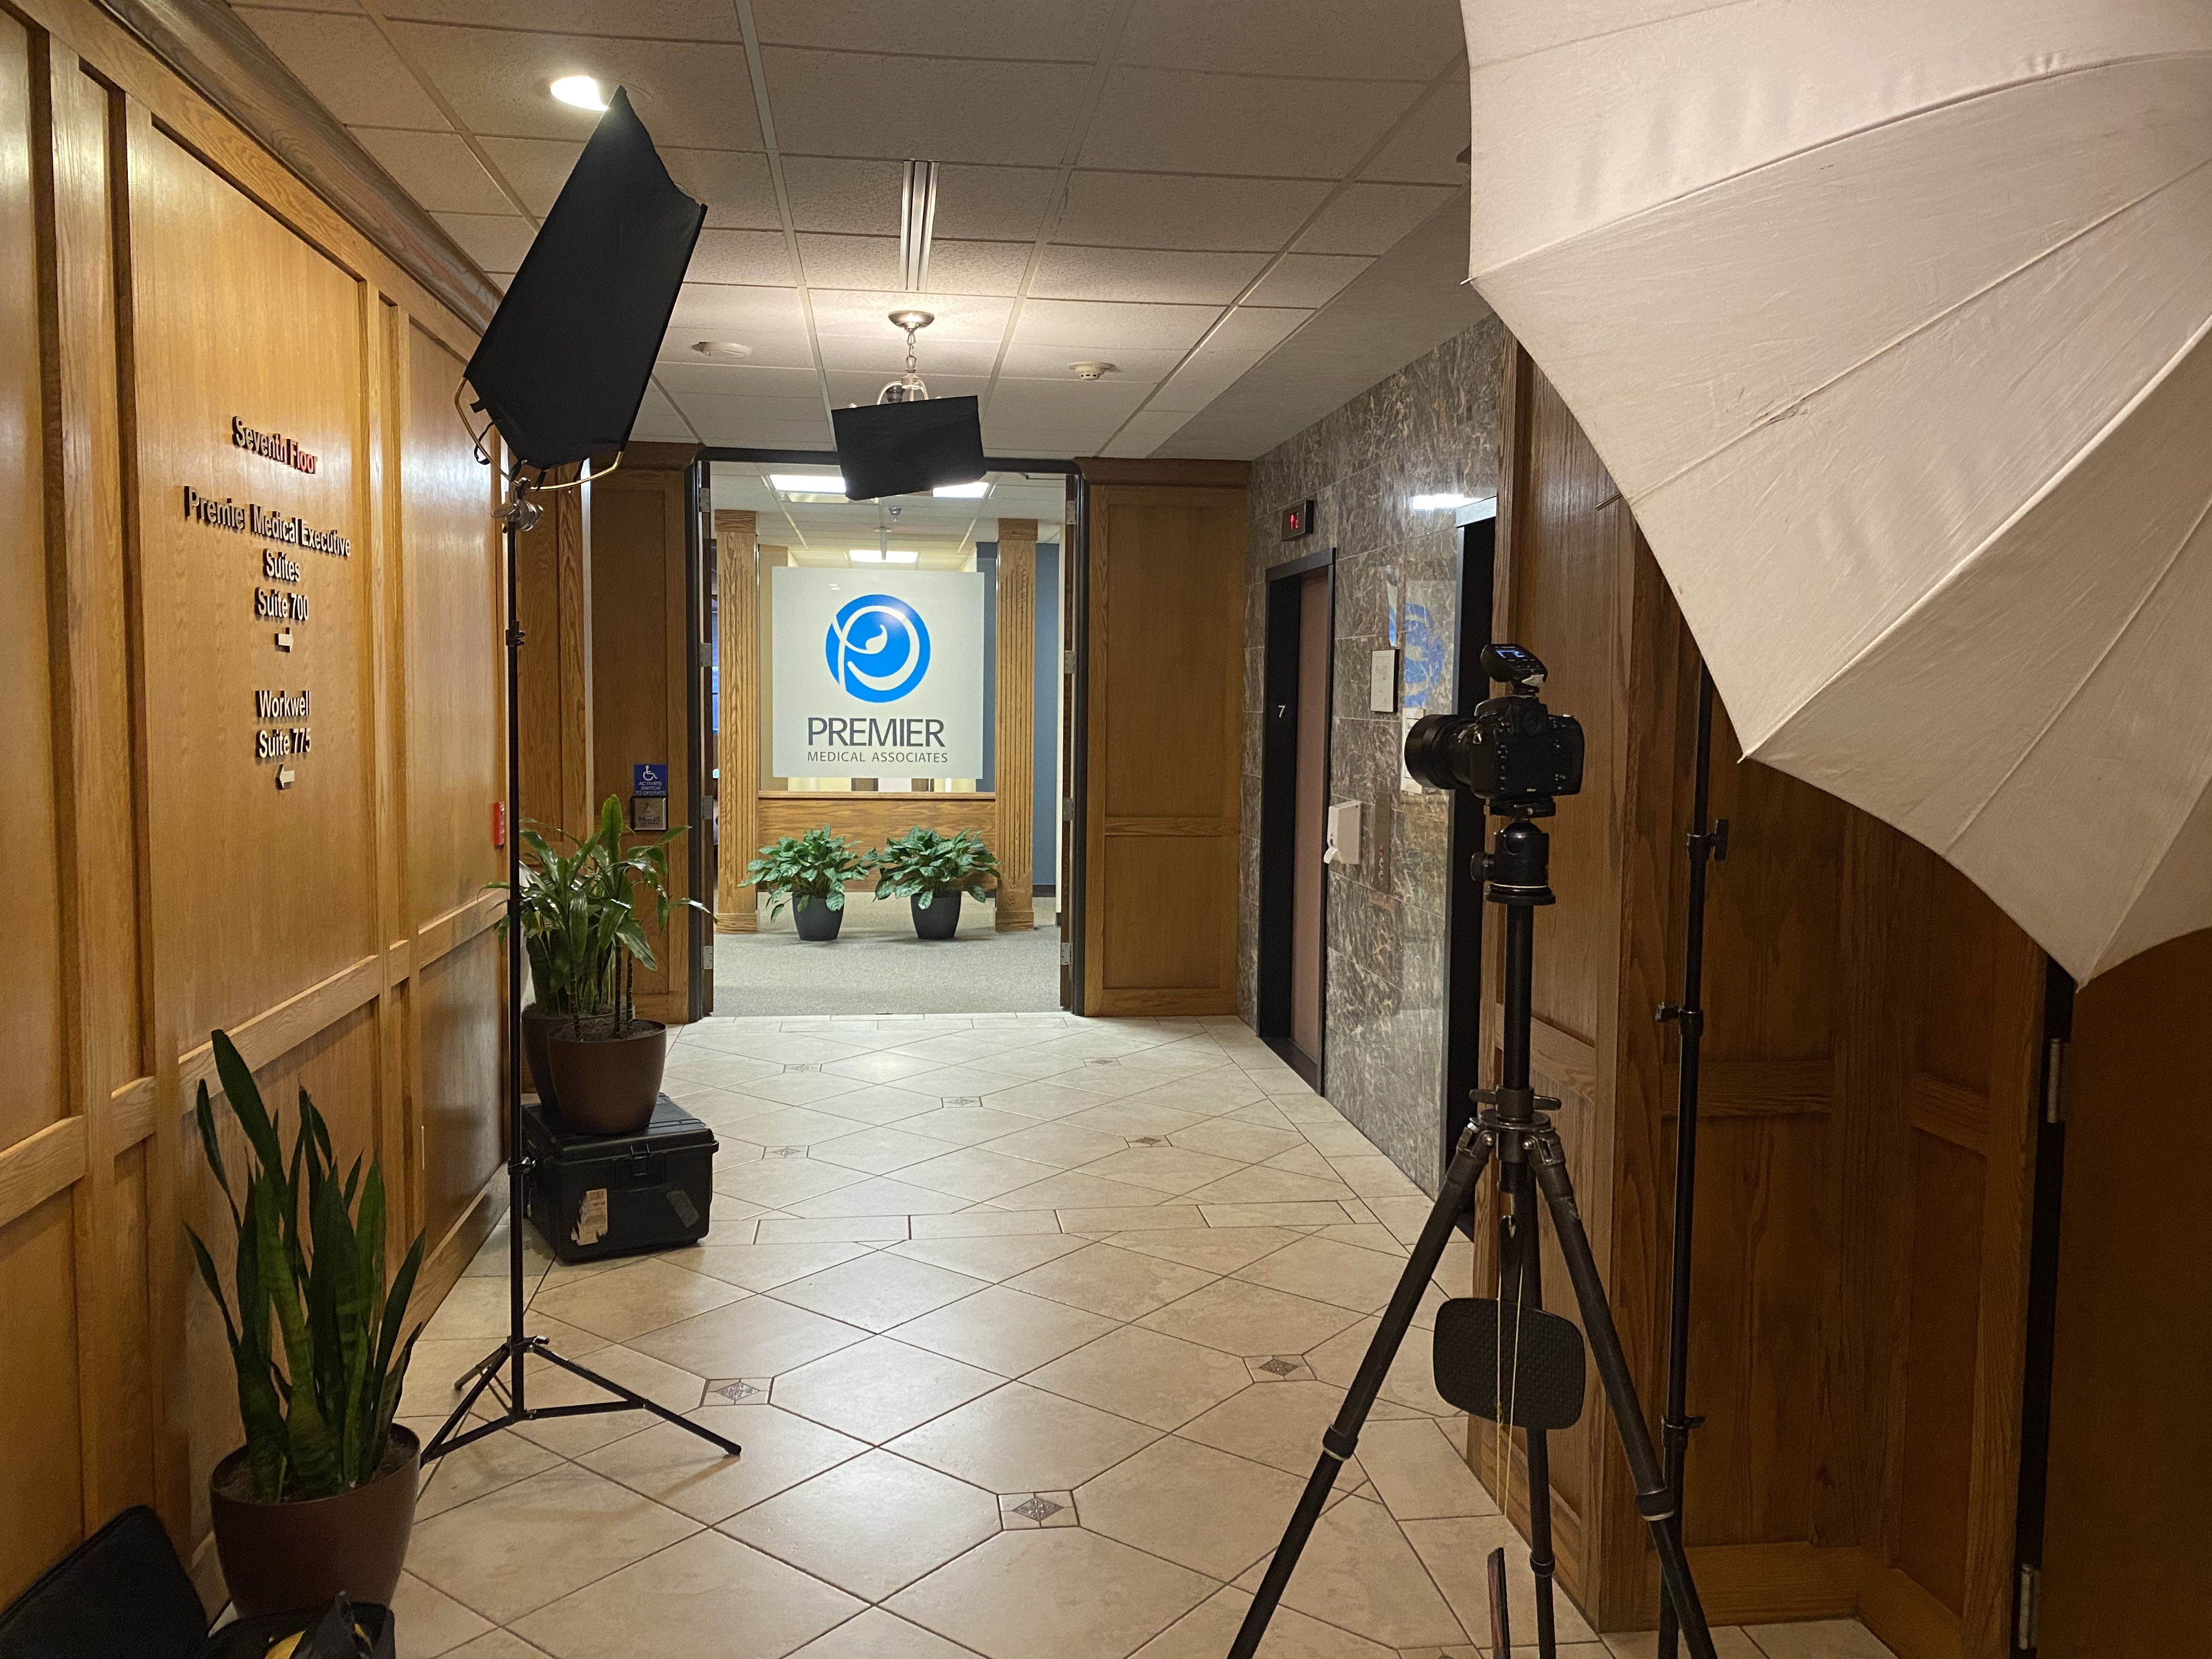
The photo below is a reverse shot of the photo above. This shows you a few more tricks of the trade. You can see my dolly, the one I use to cart all my stuff from the car to the location. I love this cart. It’s a “Rock-n-Roller cart. I highly recommend it.
You can also see how I covered the lamp hanging from the ceiling as I did in the other direction.
“Dragging Shutter” for business headshots
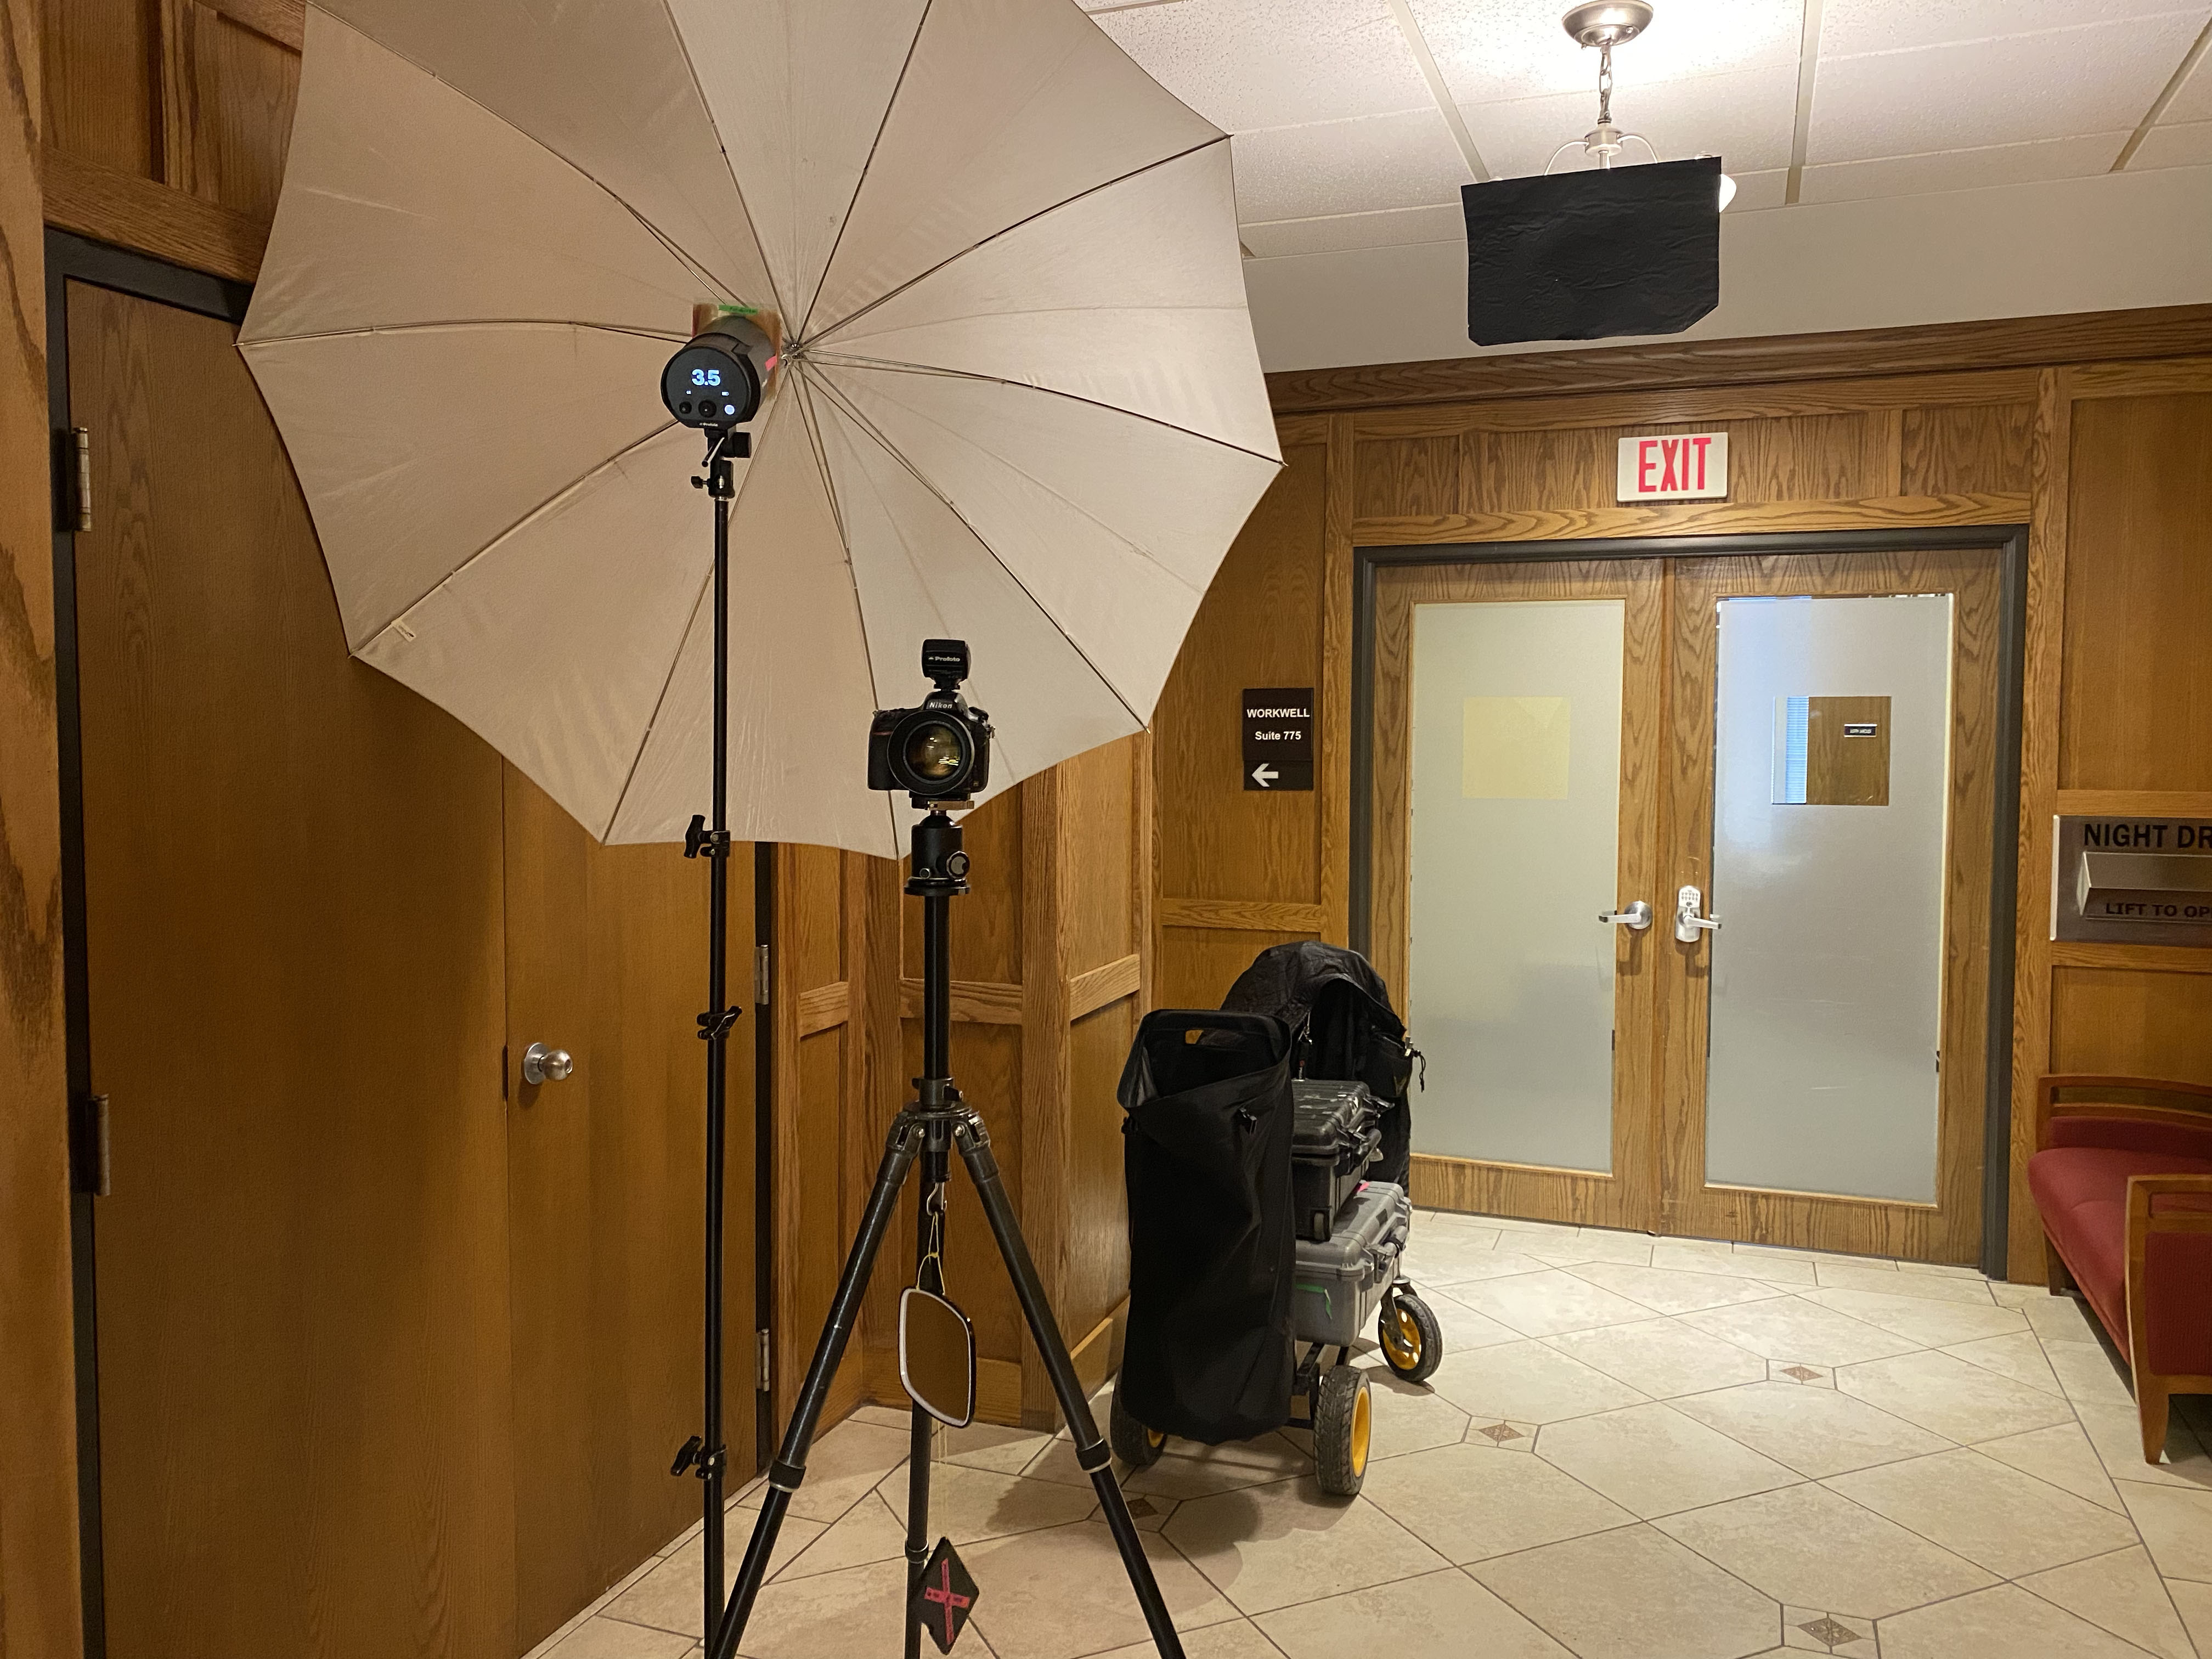
I don’t want to get into too much technical stuff here, but one technique I often use is to combine my light with the existing light at the location. Do you see the colored gels I have taped to the front of my light? This makes my strobe light emit the same color of light that is given off by the lamps in the room. I set my camera to that color and then both lights match in the final photo. The 3.5 is the setting of the intensity of the light. I dial it up and down to get the desired amount of light.
I have two things dangling from my tripod. One is a mirror, and the other is a “color checker”. I usually use the mirror to show the subject what I’m talking about if I see an issue with their hair. I ask the client to hold the “color checker” for one photo so that I can get the perfect color when retouching the photo.
Notice that the light is off to the side of the lens a bit. I’d actually like it off to the side more, but that pesky will is in the way. Most location business headshot shoots involve a bunch of compromises. That’s actually part of the fun. Flying by the seat of your pants and getting great headshots isn’t something every photographer can do. It’s gratifying to do, and I love it.
If you found this post because you were searching for someone to shoot your location business headshot, I hope you’ll consider hiring me. If you’d like to learn more about the process, please feel free to call me at 412-418-2838 or email me at mray@michaelray.com
Thanks for visiting my blog. If you’d like to see more of my location business portraits, please check out my portfolio.